Mailchimp is a very widely used tool for creating and sending out mailshots. It's what we use ourselves for our own newsletter. While it has many powerful and advanced tools that can be used if necessary, it also has many pre-built solutions to allow you to go from nothing to a professional-looking mailshot very quickly. We will outline the latter below. Note, this guide isn't designed to list every single click necessary to create your first email. Mailchimp provides lots of guidance about the specifics as you click through to each section. Instead, we will outline the general areas you will want to explore to successfully create your first mailout.
Step 1: Visit the Mailchimp site and create an account. We won't go through this process in detail as Mailchimp provides its own assistance through this process. It's just worth noting that Mailchimp requires two factor authentication. This means that codes will be sent to a mobile device in order to log in. This is fine if you are setting up an account that will only ever be accessed by one person. Less so if you're setting up an account for a company. In this case, we'd recommend setting up an overall account for the company, and then creating a separate user account for everyone that needs to access it. This means each person can enter their mobile number for authentication, rather than access being reliant on a single mobile device (the owner of which may be on holiday!)
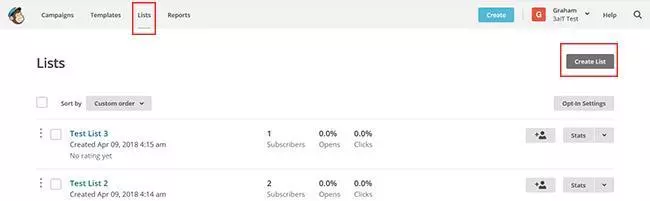
Step 2: Before you start constructing your email, you need a list of people to send it to. Go into the lists section and create a list. This will take you to a screen in which you can set the from address and name for this list. The other important thing to ensure is set on this screen is the text that explains why the receipient has received the email, and your postal address.
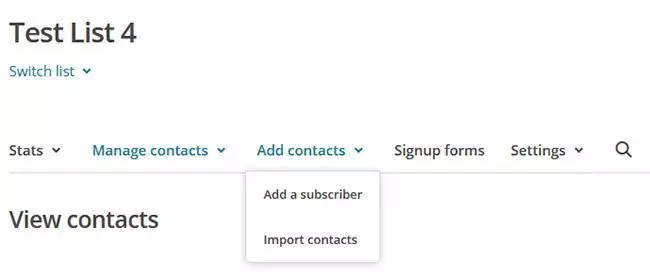
Step 3: Now your list is created, you can add your contacts into it. If it's a small list, you could use the "Add a Subscriber" option to add these individually. More likely, you'll want to use the Import Contacts feature. This allows you to import a list of names from a CSV or a copy & paste from Excel. The only required information is first name, last name and email. You can import other data if you want to (you can then use this data to send certain emails to certain groups of people if you want). The most important point to note here is that you must have permission to send to the email addresses you are importing. You could be fined under GDPR regulations if you cannot identify the precise point that a contact that you are emailing has consented to receiving this mailout.
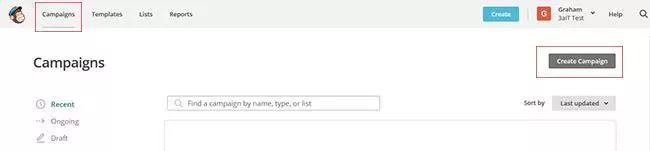
Step 4: Now you have a list of people to send to, you can now create your mailshot. To do this, navigate to the campaigns tab and create campaign. Create an email and give it a name. In the following page, you can use the list you just created in the "To" section. The "From" section should grab the info you provided when setting up this list, although you can change this if necessary. Give the mailshot a subject. Finally, click the "Design Email" button.
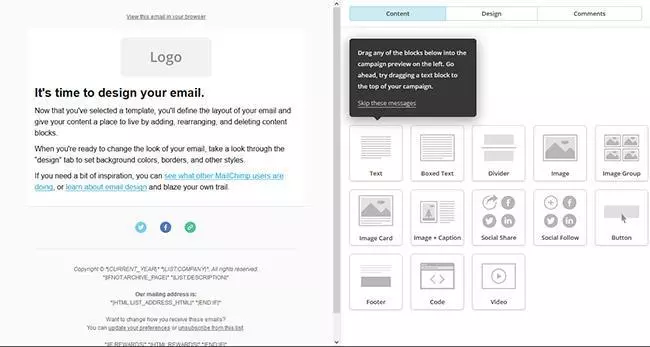
Step 5: Mailchimp then presents you with a list of pre-built templates that you can use for your mailshot. It's also possible to create your own templates that form the basis of all your mailouts. This is what we have done for our own one. However, that is too involved to cover here - maybe we'll explain this in a future HowTo! In the example above, we've simply picked the "One Column" pre-built template. As you can see, this provides a very basic layout for you to then put your content into. Just click the Logo area and upload and use your logo here. Then replace the placeholder text with your content. Easy!
You can also drag the boxes on the right into the design on the left. This allows you to add additional elements to the email such as images or separate sections with coloured backgrounds to make them stand out. Mailchimp will provide guidance for each of these as you include them, and they can be moved around the mailout (or deleted if you decide it doesn't work).
At this stage, we'd always recommend sending out a test email to yourself (and ideally to others) to check the layout and proofread. No matter how confident you are with what you may have written, it's always best to give it another check over in its final form in your inbox without the distractions of Mailchimp around it. To do this, use the "Preview and Test" option at the top, and pick "Send a test email".
Obviously, the one thing we can't help you with here is the content itself. That would very much be a topic in its own right (and we don't make any claims to be an authority here!) Just make sure you're aiming it at the right level and tone for your audience. Also, it's always best to make sure there aren't basic spelling and grammar errors. This will turn many people off instantly. You want to give people the best impression of your company. Creating a badly written mailout would probably do more harm than good in this respect.
 Step 6: Once you've saved and closed your email using the option at the bottom of the page, you will be returned to the main email creation screen with the added option to send your email at the top of the page. If you are ready to send it right now, hit the send button.
Of course, now may not be a great time to send your email. Again, think about your audience here. If you're sending primarily to business addresses, or about business related matters, you don't want to be sending your email at 17:00 on a Friday. It will be buried within their inbox by the time they next check their email. We always send ours at midday on the 1st of the month (or the first working day after this). You may want to experiment sending your messages at different times and finding out when the response rate is highest. Regardless, if whatever that time may be isn't right now, just use the "Schedule" option to get Mailchimp to automatically send out this email at some point in the future.
And that should be that! Your email is (or will be) winging its way into the inboxes of your contact list.